Farmer, keshiim 播种太阳🌞

小n快乐成长🍉


  • 首页

  • 归档

  • 分类

  • 标签

  • 关于

  • 公益404

Swift:方法

发表于 2017-11-22 | 分类于 学习 , Swift | | 阅读次数

方法 是关联了特定类型的 函数 。类,结构体以及枚举都能定义实例方法,方法封装了给定类型特定的任务和功能。类,结构体和枚举同样可以定义类型方法,这是与类型本身关联的方法。类型方法与 Objective-C 中的类方法相似。

事实上在 结构体和枚举中定义方法 是 Swift 语言与 C 语言和 Objective-C 的主要区别。在 Objective-C 中,类是唯一能定义方法的类型。但是在 Swift ,你可以选择无论类,结构体还是枚举,它们都拥有强大的灵活性来在你创建的类型中定义方法。

实例方法

实例方法 是属于 特定 类实例、结构体实例或者枚举实例的函数。他们为这些实例提供功能性,要么通过提供访问和修改实例属性的方法,要么通过提供与实例相关的功能。实例方法与函数的语法完全相同。

要写一个实例方法,你需要把它放在对应类的花括号之间。实例方法默认可以访问同类下所有其他实例方法和属性。实例方法只能在类型的具体实例里被呼叫(call)。它不能在独立于实例而被调用。

举例子:这里有个定义 Counter类的栗子,它可以用来计算动作发生的次数:

1
2
3
4
5
6
7
8
9
10
11
12
class Counter {
var count = 0
func increment() {
count += 1
}
func increment(by amount: Int) {
count += amount
}
func reset() {
count = 0
}
}

Counter 类定义了三个实例方法:

  • increment每次给计数器增加 1;
  • increment(by: Int)按照特定的整型数量来增加计数器;
  • reset会把计数器重置为零。

Counter类同样声明了一个变量属性 count来追踪当前计数器的值。

调用实例方法与属性一样都是用点语法:

1
2
3
4
5
6
7
8
let counter = Counter()
// the initial counter value is 0
counter.increment()
// the counter's value is now 1
counter.increment(by: 5)
// the counter's value is now 6
counter.reset()
// the counter's value is now 0

如同函数实际参数标签和形式参数名中描述的那样,同样的,对于方法的形式参数来说与函数也是神同步的,因为方法就是与类型关联的《函数》。

self 属性

每一个类的实例都隐含一个叫做 self的属性,它完完全全与实例本身相等。你可以使用 self属性来在当前实例当中调用它自身的方法。
在上边的例子中, increment()方法可以写成这样:

1
2
3
func increment() {
self.count += 1
}

实际上,你不需要经常在代码中写 self。如果你没有显式地写出 self,Swift会在方法中使用已知属性或者方法的时候假定你是调用了当前实例中的属性或者方法。这个假定通过在 Counter的三个实例方法中使用 count(而不是 self.count)来做了示范。

对于这个规则的一个重要例外就是当一个实例方法的形式参数名与实例中某个属性拥有相同的名字的时候。在这种情况下,形式参数名具有优先权,并且调用属性的时候使用更加严谨的方式就很有必要了。你可以使用 self来区分*形式参数名和属性名*。

这时, self就避免了叫做 x 的方法形式参数还是同样叫做 x 的实例属性这样的歧义。

1
2
3
4
5
6
7
8
9
10
11
struct Point {
var x = 0.0, y = 0.0
func isToTheRightOf(x: Double) -> Bool {
return self.x > x
}
}
let somePoint = Point(x: 4.0, y: 5.0)
if somePoint.isToTheRightOf(x: 1.0) {
print("This point is to the right of the line where x == 1.0")
}
//Print "This point is to the right of the line where x == 1.0"

除去 self 前缀,Swift 将会假定两个 x 都是叫做( x )的方法形式参数。

在实例方法中修改值类型

结构体和枚举是值类型。默认情况下,值类型属性不能被自身的实例方法修改。

总之,如果你需要在特定的方法中修改结构体或者枚举的属性,你可以选择将这个方法异变。然后这个方法就可以在方法中异变(嗯,改变)它的属性了,并且任何改变在方法结束的时候都会写入到原始的结构体中。方法同样可以指定一个全新的实例给它隐含的 self属性,并且这个新的实例将会在方法结束的时候替换掉现存的这个实例。
你可以选择在 func关键字前放一个 mutating关键字来使用这个行为:

1
2
3
4
5
6
7
8
9
10
11
struct Point {
var x = 0.0, y = 0.0
mutating func moveBy(x deltaX: Double, y deltaY: Double) {
x += deltaX
y += deltaY
}
}
var somePoint = Point(x: 1.0, y: 1.0) // not let somePoint
somePoint.moveBy(x: 2.0, y: 3.0)
print("The point is now at (\(somePoint.x), \(somePoint.y))")
// prints "The point is now at (3.0, 4.0)"

上文中的 Point 结构体定义了一个异变方法 moveBy(x:y:),它以特定的数值移动一个 Point实例。相比于返回一个新的点,这个方法实际上修改了调用它的点。 被添加到定义中的 mutating关键字允许它修改自身的属性。

注意,如同 常量结构体实例的存储属性 里描述的那样,你不能在常量结构体类型里调用异变方法,因为自身属性不能被改变,就算它们是变量属性:

下面代码中调用会编译报错:

1
2
3
let fixedPoint = Point(x: 3.0, y: 3.0)
fixedPoint.moveBy(x: 2.0, y: 3.0)
// this will report an error

在变异方法里指定自身

变异方法可以指定整个实例给隐含的self属性。上文中那个Point的栗子可以用下边的代码替代:

1
2
3
4
5
6
struct Point {
var x = 0.0, y = 0.0
mutating func moveBy(x deltaX: Double, y deltaY: Double) {
self = Point(x: x + deltaX, y: y + deltaY)
}
}

这次的异变方法 moveBy(x:y:)创建了一个 x和 y设置在目的坐标的全新的结构体。调用这个版本的方法和的结果会和之前那个完全一样。

枚举的异变方法可以设置隐含的 self属性为相同枚举里的不同成员:

1
2
3
4
5
6
7
8
9
10
11
12
13
14
15
16
17
18
enum TriStateSwitch {
case off, low, high
mutating func next () {
switch self {
case .low:
self = .high
case .off:
self = .low
case .high:
self = .off
}
}
}
var ovenLight = TriStateSwitch.low
ovenLight.next()
// ovenLight is now equal to .high
ovenLight.next()
// ovenLight is now equal to .off

这个栗子定义了一个三种开关状态的枚举。每次调用 next()方法时,这个开关就会在三种不同的电力状态( Off , low和 high)下切换。

类方法

如上文描述的那样,实例方法是特定类型实例中调用的方法。你同样可以定义在类型本身调用的方法。这类方法被称作类型方法。你可以通过在 func关键字之前使用 static关键字来明确一个类型方法。
类同样可以使用 class关键字来允许子类重写父类对类型方法的实现。

注意:
在 Objective-C 中,你只能在 Objective-C 的类中定义类级别的方法。但是在 Swift 里,你可以在所有的类里定义类级别的方法,还有结构体和枚举。每一个类方法都能够对它自身的类范围显式生效。

类型方法和实例方法一样使用点语法调用。不过,你得在类上调用类型方法,而不是这个类的实例。接下来是一个在 SomeClass类里调用类型方法的栗子:

1
2
3
4
5
6
7
class SomeClass {
class func someTypeMethod() {
print("调用了someclass")
}
}
SomeClass.someTypeMethod()
//Prints "用了someclass"

在类型方法的函数体中,隐含的 self属性指向了类本身而不是这个类的实例。对于结构体和枚举,这意味着你可以使用 self来 消除类型属性和类型方法形式参数之间的歧义 ,用法和实例属性与实例方法形式参数之间的用法完全相同。

一般来说,你在类型方法函数体内书写的任何非完全标准的方法和属性名 都将会指向另一个类级别的方法和属性。一个类型方法可以使用方法名调用另一个类型方法, 并不需要使用类型名字作为前缀 。同样的,结构体和枚举中的类型方法也可以通过直接使用类型属性名而不需要写类型名称前缀来访问类型属性。

下边的栗子定义了一个叫做 LevelTracker的结构体,它通过不同的等级或者阶层来追踪玩家的游戏进度。这是一个单人游戏,但是可以在一个设备上储存多个玩家的信息。

当游戏第一次开始的时候所有的的游戏等级(除了第一级)都是锁定的。每当一个玩家完成一个等级,那这个等级就对设备上的所有玩家解锁。 LevelTracker结构体使用类型属性和方法来追踪解锁的游戏等级。它同样追踪每一个独立玩家的当前等级。

1
2
3
4
5
6
7
8
9
10
11
12
13
14
15
16
17
18
19
20
struct LevelTracker {
static var hightestUnlockedLevel = 1
var currentLevel = 1
static func unlock(_ level: Int) {
if level > hightestUnlockedLevel { hightestUnlockedLevel = level }
}
static func isUnlocked(_ level: Int) -> Bool {
return level <= hightestUnlockedLevel
}
@discardableResult
mutating func advance(to level: Int) -> Bool {
if LevelTracker.isUnlocked(level) {
currentLevel = level
return true
} else {
return false
}
}
}

LevelTracker结构体持续追踪任意玩家解锁的最高等级。这个值被储存在叫做 highestUnlockedLevel的类型属性里边。

LevelTracker同时还定义了两个类型函数来操作 highestUnlockedLevel属性。第一个类型函数叫做 unlock(_:),它在新等级解锁的时候更新 highestUnlockedLevel。第二个是叫做 isUnlocked(_:)的便捷类型方法,如果特定等级已经解锁,则返回 true。(注意这些类型方法可以访问 highestUnlockedLevel类型属性而并不需要写作 LevelTracker.highestUnlockedLevel。)

除了其自身的类型属性和类型方法, LevelTracker还追踪每一个玩家在游戏中的进度。它使用一个实例属性 currentLevel来追踪当前游戏中的游戏等级。

为了帮助管理 currentLevel属性, LevelTracker定义了一个叫做 advance(to:)的实例方法。在更新 currentLevel之前,这个方法会检查请求的新等级是否解锁。 advance(to:)方法返回一个布尔值来明确它是否真的可以设置 currentLevel。由于调用时忽略 advance(to:) 的返回值并不是什么大不了的问题,这个函数用 @discardableResult 标注。

看下边的栗子, LevelTracker结构体与 Player类共同使用来追踪和更新每一个玩家的进度:

1
2
3
4
5
6
7
8
9
10
11
class Player {
var tracker = LevelTracker()
let playerName: String
func completedLevel(level: Int) {
LevelTracker.unlockLevel(level + 1)
tracker.advanceToLevel(level + 1)
}
init(name: String) {
playerName = name
}
}

Player类创建了一个新的 LevelTracker实例 来追踪玩家的进度。它同事提供了一个叫做 complete(level:)的方法,这个方法在玩家完成一个特定等级的时候会被调用。这个方法会为所有的玩家解锁下一个等级并且更新玩家的进度到下一个等级。( advance(to:)返回的布尔值被忽略掉了,因为等级已经在先前调用 LevelTracker.unlock(_:)时已知解锁。)
你可以通过为 Player类创建一个实例来新建一个玩家,然后看看当玩家达成等级1时会发生什么:

1
2
3
4
5
6
7
8
var player = Player(name: "Argyrios")
player.complete(level: 1)
print("highest unlocked level is now \(LevelTracker.highestUnlockedLevel)")
// Prints "highest unlocked level is now 2"
var player = Player(name: "Argyrios")
player.complete(level: 1)
print("highest unlocked level is now \(LevelTracker.highestUnlockedLevel)")
// Prints "highest unlocked level is now 2"

如果你创建了第二个玩家,当你让他尝试进入尚未被任何玩家在游戏中解锁的等级时, 设置玩家当前等级的尝试将会失败:

1
2
3
4
5
6
7
player = Player(name: "Beto")
if player.tracker.advance(to: 6) {
print("player is now on level 6")
} else {
print("level 6 has not yet been unlocked")
}
// Prints "level 6 has not yet been unlocked"

摘自:swift 官网
所有代码在Xcode9 Swift4 环境编译没问题,代码戳这里 https://github.com/keshiim/LearnSwift4
Leetcode-717 1-bit and 2-bit Characters

发表于 2017-11-22 | 分类于 LeetCode | | 阅读次数

题目描述

We have two special characters. The first character can be represented by one bit 0. The second character can be represented by two bits(10or11).

Now given a string represented by several bits. Return whether the last character must be a one-bit character or not. The given string will always end with a zero.

Example1

Input: 
bits = [1, 0, 0]
Output: True
Explanation: 
The only way to decode it is two-bit character and one-bit character. So the last character is one-bit character.

Example2

Input: 
bits = [1, 1, 1, 0]
Output: False
Explanation: 
The only way to decode it is two-bit character and two-bit character. So the last character is NOT one-bit character.

Note

  • $1\leq len(bits)\leq 1000$.
  • bits[i] is always 0 or 1

解法一

分析:这道题说有两种特殊的字符,一种是两位字符,只能是二进制的11和10,另一种是单个位字符,只能是二进制的0。现在给我们了一个包含0和1的数组,问我们是否能够将其正确的分割,使得最后一个字符是个单个位字符。

这道题使用贪心散发来做,因为两种位字符互不干扰,只要我们遍历到了数字1,那么气必定是两位字符,所以后面以为也得跟着,而遍历到了数字0,那么就必定是单个位字符。

所以,我们可以用一个变量i来记录当前遍历到的位置,如果遇到了0,那么i自增1,如果遇到了1,那么i自增2,我们循环的条件是i < n-1,即留出最后一位,所以当循环退出后,当i正好停留在n - 1上,说明最后以为是单独分割开的,因为题目中限定了最后一位一定是0,就没有必要判断了,代码如下:

C++

1
2
3
4
5
6
7
8
9
10
11
class Solution {
public:
bool isOneBitCharacter(vector<int>& bits) {
int n = bits.size(), i = 0;
while (i < n - 1) {
if (bits[i] == 0) ++i;
else i+= 2;
}
return i == n - 1;
}
};

Swift

1
2
3
4
5
6
7
8
9
10
11
12
13
14
class Solution {
func isOneBitCharacter(_ bits: [Int]) -> Bool {
let n = bits.count
var i = 0
while i < n - 1 {
if bits[i] == 0 {
i+= 1
} else {
i += 2
}
}
return i == n - 1
}
}

解法二

下面这种解法写的更加简洁了,直接用一行代替了if..else..语句,相当巧妙,当bits[i]为0时,i还是相当于自增了1,当bits[i]为1时,i相当于自增了2,最后还是在循环跳出后检测i是否为n-1,参见代码如下:

C++

1
2
3
4
5
6
7
8
9
10
class Solution {
public:
bool isOneBitCharacter(vector<int>& bits) {
int n = bits.size(), i = 0;
while (i < n - 1) {
i += bits[i] + 1;
}
return i == n - 1;
}
};

Swift

1
2
3
4
5
6
7
8
9
10
class Solution {
func isOneBitCharacter(_ bits: [Int]) -> Bool {
let n = bits.count
var i = 0
while i < n - 1 {
i += bits[i] + 1
}
return i == n - 1
}
}

解法三

下面我们来看递归解法,用的是回溯的思想,首先判断如果bits为空了,直接返回false,因为题目初始给的bits是非空的,在调用递归函数中为空了说明最后一位跟倒数第二位组成了个两位字符,所以不合题意返回false。再判断如果bits大小为1了,那么返回这个数字是否为0,其实直接返回true也行,因为题目中说了最后一个数字一定是0。然后我们新建一个数组t,如果bits的首元素为0,则我们的t赋值为去掉首元素的bits数组;如果bits的首元素是1,则我们的t服之为去掉前两个元素的bits数组,然后返回调用递归函数的结果即可,参见代码如下:

C++

1
2
3
4
5
6
7
8
9
10
11
12
13
14
class Solution {
public:
bool isOneBitCharactor(vector<int>& bits) {
if (bits.empty()) return false;
if (bits.size() == 1) return bits[0] == 0;
vector<int> t;
if (bits[0] == 0) {
t = vector<int>(bits.begin() + 1, bits.end());
} else if (bits[0] == 1) {
t = vector<int>(bits.begin() + 2, bits.end())
}
return isOneBitCharactor(t);
}
}

Swift

1
2
3
4
5
6
7
8
9
10
11
12
func isOneBitCharacter1(_ bits: [Int]) -> Bool {
if bits.isEmpty { return false }
if bits.count == 1 { return bits[0] == 0 }
var t = Array<Int>()
if bits[0] == 0 {
t = Array(bits[1..<bits.endIndex])
} else if bits[0] == 1 {
t = Array(bits[2..<bits.endIndex])
}
return isOneBitCharacter1(t)
}
print(isOneBitCharacter1([1, 1, 0, 0]))

解法四

下面这种解法也是用的递归,递归函数用的不是原函数,这样可以只用位置变量idx来遍历,而不用新建数组t,初始时idx传入0,在递归函数中,

如果idx为n了,相当于上面解法中的bits数组为空了情况,返回false;

如果idx为n-1,返回 bits[idx] == 0;

如果bits[idx]为0,则返回调用递归函数的结果,此时idx加上1;

如果bits[idx]为1,则返回调用递归函数的结果,此时idx加上2,参见代码如下:

C++

1
2
3
4
5
6
7
8
9
10
11
12
13
class Solution {
public:
bool isOneBitCharacter(vector<int>& bits) {
return helper(bits, 0);
}
bool helper(vector<int>& bits, int idx) {
int n = bits.size();
if (idx == n) return false;
if (idx == n - 1) return bits[idx] == 0;
if (bits[idx] == 0) return helper(bits, idx + 1);
return helper(bits, idx + 2);
}
};

Swift

1
2
3
4
5
6
7
8
9
10
11
12
func isOneBitCharacter2(_ bits: [Int]) -> Bool {
return helper(bits, idx: 0)
}
func helper(_ bits: [Int], idx: Int) -> Bool {
let n = bits.count
if idx == n { return false }
if idx == n - 1 { return bits[idx] == 0 }
if (bits[idx] == 0) { return helper(bits, idx: idx + 1) }
return helper(bits, idx: idx + 2)
}
print(isOneBitCharacter2([1,1,0,0]))
// Print true

Leetcode-448 Find All Numbers Disappeared in an Array

发表于 2017-11-22 | 分类于 LeetCode | | 阅读次数

题目描述

Find All Numbers Disappeared in an Array 缺失值查找

Given an array of integers where $1\leq a[i]\leq n$ (n=size of array), some elements appear twice and tohers appear once. Find all the elements of [1, n] inclusive that do not appear in this array.
Could you do it without extra space and in $O(n)$ runtime? You may assume the returned list does not count as extra space.

Example

Input:
[4,3,2,7,8,2,3,1]

Output:
[5,6]

解法一:

这道题让我们找出数组中所有消失的数。乍一看,先拍个序,再遍历整个数组找出未出现数字。但是这要求我们不借助辅助空间且在O(n)复杂度内完成。那这道题的一个最重要的条件就是$1\leq a[i]\leq n$ (n=size of array)。这里有三种解法。首先先来看第一种解法,这种解法的思路是,对每个数组nums[i],如果对应的nums[nums[i] - 1]是正数,我们就赋值为其相反数,如果已经是负数不变,那么最后我们只要把留下的证书对应的位置加入结果集res中即可,代码如下:

C++

1
2
3
4
5
6
7
8
9
10
11
12
13
14
15
16
class Solution {
public:
vector<int> findDisappearedNumbers(vector<int>& nums) {
vector<int> res;
for (int i = 0; i < nums.size(); i++) {
int idx = abs(nums[i]) - 1
nums[idx] = (nums[idx] > 0) ? -nums[idx] : nums[idx];
}
for (int i = 0; i < nums.size(); i++) {
if (nums[i] > 0) {
res.push_back(i + 1);
}
}
return res;
}
}

Swift

1
2
3
4
5
6
7
8
9
10
11
12
13
14
15
16
func findDisappearedNumbers(_ nums: [Int]) -> [Int] {
var res: [Int] = [Int]()
var nums = nums
for i in 0..<nums.count {
let idx = abs(nums[i]) - 1
nums[idx] = (nums[idx] > 0) ? -nums[idx] : nums[idx]
}
for i in 0..<nums.count {
if nums[i] > 0 {
res.append(i + 1)
}
}
return res
}
print(findDisappearedNumbers([4,3,2,7,8,2,3,1]))
// Prints [5, 6]

解法二:

方法二是将nums[i]置换到其对应的位置nums[nums[i] - 1]上去,比如对于没有缺失项的正确的顺序应该是[1, 2, 3, 4, 5, 6, 7, 8,而我们现在确实[4, 3, 2, 7, 8, 2, 3, 1],我们需要把数组移动到正确的位置上去,比如第一个4就应该和7先交换个位置,以此类推,最后得到的顺序应该是[1, 2, 3, 4, 3, 2, 7, 8],我们最后对应位置检验,如果nums[i]和 i+1不等,那么我们将i+1存入结果res中即可,代码如下:

C++

1
2
3
4
5
6
7
8
9
10
11
12
13
14
15
16
17
18
class Solution {
public:
vector<int> findDisappearedNumbers(vector<int>& nums) {
vector<int> res;
for (int i = 0; i < nums.size(); i++) {
if (nums[i] != nums[nums[i] - 1]) {
swap(nums[i], nums[nums[i] - 1]);
--i;
}
}
for (int i = 0; i < nums.size(); i++) {
if (nums[i] != i + 1) {
res.push_back(i + 1);
}
}
return res;
}
}

Swift

1
2
3
4
5
6
7
8
9
10
11
12
13
14
15
16
17
18
19
20
func findDisappearedNumbers1(_ nums: [Int]) -> [Int] {
var res = [Int]()
var nums = nums
var i = 0
while i < nums.count {
if nums[i] != nums[nums[i] - 1] {
nums.swapAt(i, nums[i] - 1);
} else {
i += 1;
}
}
for i in 0..<nums.count {
if nums[i] != i + 1 {
res.append(i + 1)
}
}
return res
}
print(findDisappearedNumbers1([4,3,2,7,8,2,3,1]))

解法三:

和方法一类似,都对nums[nums[i]-1]数值做操作,不同的是方法一对值进行负数处理。下面这种方法是对nums[nums[i]-1]位置的数值累加数组长度n,注意nums[i] - 1有可能越界,所以我们需要对n取余,最后要找出确实的数只需要看nums[i]的值是否小于等于n即可,最后遍历完nums[i]数组为[12, 19, 18, 15, 8, 2, 11, 9],我们发现有两个数字8和2小于等于n,那么就可以通过i + 1来得到正确的结果5、6,代码如下:

C++

1
2
3
4
5
6
7
8
9
10
11
12
13
14
15
16
class Solution {
public:
vector<int> findDisappearedNumbers(vector<int>& nums) {
vector<int> res;
for (int i = 0; i < nums.size(); i++) {
int idx = nums[i] - 1;
nums[idx % n] += n;
}
for (int i = 0; i < n; i++) {
if (nums[i] <= n) {
res.push_back(i + 1);
}
}
return res;
}
}

Swift

1
2
3
4
5
6
7
8
9
10
11
12
13
14
15
16
func findDisappearedNumbers2(_ nums: [Int]) -> [Int] {
var res = [Int]()
var nums = nums
let n = nums.count
for i in 0..<nums.count {
let idx = nums[i] - 1
nums[idx % n] += n
}
for i in 0..<n {
if nums[i] <= n {
res.append(i + 1)
}
}
return res
}
print(findDisappearedNumbers2([4,3,2,7,8,2,3,1]))

Leetcode-695 Max Area of Island

发表于 2017-11-20 | 分类于 LeetCode | | 阅读次数

题目描述

Given a non-empty 2D array grid of 0’s and 1’s, an island is a group of 1’s (representing land) connected 4-directionally (horizontal or vertical.) You may assume all four edges of the grid are surrounded by water.

Find the maximum area of an island in the given 2D array. (If there is no island, the maximum area is 0.)

Example 1:

1
2
3
4
5
6
7
8
[[0,0,1,0,0,0,0,1,0,0,0,0,0],
[0,0,0,0,0,0,0,1,1,1,0,0,0],
[0,1,1,0,1,0,0,0,0,0,0,0,0],
[0,1,0,0,1,1,0,0,1,0,1,0,0],
[0,1,0,0,1,1,0,0,1,1,1,0,0],
[0,0,0,0,0,0,0,0,0,0,1,0,0],
[0,0,0,0,0,0,0,1,1,1,0,0,0],
[0,0,0,0,0,0,0,1,1,0,0,0,0]]

Given the above grid, return 6. Note the answer is not 11, because the island must be connected 4-directionally.

Example 2:

1
[[0,0,0,0,0,0,0,0]]

Given the above grid, return 0.

Note

The length of each dimension in the given grid does not exceed 50.

解法一:

这道题跟Number of Islands 和 Number of Distinct Islands 是同一种类型的,不过这道题要统计岛的大小,再来更新结果res。先用递归来做,遍历grid,当遇到为1的点,我们调用递归函数,在递归函数中,我们首先判断i和j是否越界,还有grid[i][j]是否为1,我们没有用visited数组,而是直接修改了grid数组,遍历过的标记为-1。如果合法,那么cnt自增1,并且更新结果res,然后对其周围四个相邻位置分别调用递归函数即可,代码如下:

C++

1
2
3
4
5
6
7
8
9
10
11
12
13
14
15
16
17
18
19
20
21
22
23
24
class Solution {
public:
vector<vector<int>> dirs{{0, -1}, {-1, 0}, {0, 1}, {1, 0}};
int maxAreaOfIsland(vector<vector<int>>& grid) {
int m = grid.size(), n = grid[0].size(), res = 0;
for (int i = 0; i < m; i++) {
for (int j = 0; j < n; j++) {
if (grid[i][j] != 1) continue;
int cnt = 0;
helper(grid, i, j, cnt, res);
}
}
return res;
}
void helper(vector<vector<int>>& grid, int i, int j, int& cnt, int& res) {
int m = grid.size(), n = grid[0].size();
if (i < 0 || i >= m || j < 0 || j >= n || grid[i][j] <= 0) return;
res = max(res, ++cnt);
grid[i][j] *= -1;
for (auto dir : dirs) {
helper(grid, i + dir[0], j + dir[1], cnt, res);
}
}
};

swift

1
2
3
4
5
6
7
8
9
10
11
12
13
14
15
16
17
18
19
20
21
22
23
24
25
26
class Solution {
let dirs = [[0, -1], [-1, 0], [0, 1], [1, 0]]
func maxAreaOfIsland(_ grid: [[Int]]) -> Int {
let m = grid.count, n = grid[0].count
var grid = grid
var res = 0
for i in 0..<m {
for j in 0..<n {
if grid[i][j] != 1 { continue }
var cnt = 0
helper(&grid, i: i, j: j, cnt: &cnt, res: &res)
}
}
return res
}
func helper(_ grid: inout [[Int]], i: Int, j: Int, cnt: inout Int, res: inout Int) {
let m = grid.count, n = grid[0].count
if i < 0 || i >= m || j < 0 || j >= n || grid[i][j] <= 0 { return }
cnt+=1
res = max(res, cnt)
grid[i][j] *= -1
for dir in dirs {
helper(&grid, i: i + dir[0], j: j + dir[1], cnt: &cnt, res: &res)
}
}
}

解法二:

下面是迭代的写法,BFS遍历,使用queue来辅助运算,思路没啥太大区别,都是套路,都是模版,往里套就行了,参见代码如下:

C++

1
2
3
4
5
6
7
8
9
10
11
12
13
14
15
16
17
18
19
20
21
22
23
24
25
26
class Solution {
public:
vector<vector<int>> dirs{{0, -1}, {-1, 0}, {0, 1}, {1, 0}};
int maxAreaOfIsland(vector<vector<int>>& grid) {
int m = grid.size(), n = grid[0].size(), res = 0;
for (int i = 0; i < m; i++) {
for (int j = 0; j < n; j++) {
if (grid[i][j] != 1) continue;
int cnt = 0;
queue<pair<int, int>> q{{{i, j}}};
grid[i][j] *= -1;
while (!q.empty()) {
auto t = q.front(); q.pop();
res = max(res, ++cnt);
for (auto dir : dirs) {
int x = t.first + dir[0], y = t.second + dir[1];
if (x < 0 || x >= m || y < 0 || y >= n || grid[x][y] <= 0) continue;
grid[x][y] *= -1;
q.push({x, y});
}
}
}
}
return res;
}
};

Swift:属性

发表于 2017-11-17 | 分类于 学习 , Swift | | 阅读次数

属性可以将值与特定的类、结构体或者是枚举联系起来。存储属性 会存储 常量或变量 作为实例的一部分,反之计算属性会计算(而不是存储)值。计算属性 可以由类、结构体和枚举定义。
存储属性只能由类和结构体定义。

通常存储属性和计算属性通常和特定类型的实例相关联。总之,属性也可以与类型本身相关联。这种属性就是所谓的类型属性。

另外,你也可以定义属性观察器来检查属性中值的变化,这样你就可以用自定义的行为来响应。属性观察器可以被添加到你自己定义的存储属性中,也可以添加到子类从他的父类那里所继承来的属性中。

存储属性

在其最简单的形式下,存储属性是一个作为特定类和结构体实例一部分的常量或变量。存储属性要么是变量存储属性(由 var 关键字引入)要么是常量存储属性(由 let 关键字引入)。

你可以为存储属性提供一个默认值作为它定义的一部分。你也可以在初始化的过程中设置和修改存储属性的初始值。正如在初始化中分配常量属性所述,这一点对于常量存储属性也成立。

下面的例子定义了一个名为 FixedLengthRange 的结构体,它描述了一个一旦被创建长度就不能改变的整型值域:

1
2
3
4
5
6
7
8
struct FixedLengthRange {
var firstValue: Int
let length: Int
}
var rangeOfThreeItems = FixedLengthRange(firstValue: 0, length: 3)
// the range represents integer values 0, 1, and 2
rangeOfThreeItems.firstValue = 6
// the range now represents integer values 6, 7, and 8

FixedLengthRange 的实例有一个名为 firstValue 的变量存储属性和一个名为 length 的常量存储属性。在上面的例子中,当新的值域创建时 length 已经被创建并且不能再修改,因为这是一个常量属性。

常量结构体实例的存储属性

当你创建了一个结构体的实例并且把这个实例赋给常量,你不能修改这个实例的属性, 即使是声明为变量的属性:

1
2
3
let rangeOfFourItems = FixedLengthRange(firstValue: 0, length: 4)
rangeOfFourItems.firstValue = 6
//compile error: cannot assign to property: 'rangeOfFourItems' is a 'let' constant

由于 rangeOfFourItems 被声明为常量(用 let 关键字),我们不能改变其 firstValue 属性,即使 firstValue 是一个变量属性。

1
2
"这是由于结构体是值类型。当一个值类型的实例被标记为常量时,该实例的其他属性也均为常量。"
"对于类来说则不同,它是引用类型。如果你给一个常量赋值引用类型实例,你仍然可以修改那个实例的变量属性。"

延迟存储属性

延迟存储属性的初始值在其第一次使用时才进行计算。你可以通过在其声明前标注 lazy 修饰语来表示一个延迟存储属性。

你必须把延迟存储属性声明为变量(使用 var 关键字),因为它的初始值可能在实例初始化完成之前无法取得。常量属性则必须在初始化完成之前有值,因此不能声明为延迟。

延时属性的使用场景:一个属性的初始值可能依赖于某些外部因素,当这些外部因素的值只有在实例的初始化完成后才能得到时,延迟属性就可以发挥作用了。而当属性的初始值需要执行复杂或代价高昂的配置才能获得,你又想要在需要时才执行,延迟属性就能够派上用场了。

下面这个栗子使用了一个延迟存储属性来避免复杂类不必要的初始化。这个例子定义了两个名为 DataImporter和 DataManager 的类:

1
2
3
4
5
6
7
8
9
10
11
12
13
14
15
16
17
18
19
class DataImporter {
//DataImporter is a class to import data from an external file.
//The class is assumed to take a non-trivial amount of time to initialize.
var fileName = "data.txt"
// the DataImporter class would provide data importing functionality here
}
class DataManager {
lazy var importer = DataImporter()
var data = [String]()
// the DataManager class would provide data management functionality here
}
let manager = DataManager()
manager.data.append("Some data")
manager.data.append("Some more data")
// the DataImporter instance for the importer property has not yet been created

下面👇是一堆很啰嗦的业务描述:
类 DataManager 有一个名为 data 的存储属性,它被初始化为一个空的新 String 数组。尽管它的其余功能没有展示出来,还是可以知道类 DataManager 的目的是管理并提供访问这个 String 数组的方法。

DataManager 类的功能之一是从文件导入数据。此功能由 DataImporter 类提供,它假定为需要一定时间来进行初始化。这大概是因为 DataImporter 实例在进行初始化的时候需要打开文件并读取其内容到内存中。

DataManager 实例并不要从文件导入数据就可以管理其数据的情况是有可能发生的,所以当 DataManager 本身创建的时候没有必要去再创建一个新的 DataImporter 实例。反之,在 DataImporter 第一次被使用的时候再创建它才更有意义。

因为它被 lazy 修饰符所标记,只有在 importer 属性第一次被访问时才会创建 DataManager 实例,比如当查询它的 fileName 属性时:

1
2
3
print(manager.importer.fileName)
// the DataImporter instance for the importer property has now been created
// prints "data.txt"

注意:如果被标记为 lazy 修饰符的属性同时被多个线程访问并且属性还没有被初始化,则无法保证属性只初始化一次。

存储属性与实例变量

如果你有 Objective-C 的开发经验,那你应该知道在类实例里有两种方法来存储值和引用。另外,你还可以使用实例变量作为属性中所储存的值的备份存储。

Swift 把这些概念都统一到了属性声明里。Swift 属性没有与之相对应的实例变量,并且属性的后备存储不能被直接访问。这避免了不同环境中对值的访问的混淆并且将属性的声明简化为一条单一的、限定的语句。所有关于属性的信息——包括它的名字,类型和内存管理特征——都作为类的定义放在了同一个地方。

计算属性

除了存储属性,类、结构体和枚举也能够定义计算属性,而它实际并不存储值。相反,他们提供一个读取器和一个可选的设置器来间接得到和设置其他的属性和值。

1
2
3
4
5
6
7
8
9
10
11
12
13
14
15
16
17
18
19
20
21
22
23
24
25
26
27
struct Point {
var x = 0.0, y = 0.0
}
struct Size {
var width = 0.0, height = 0.0
}
struct Rect {
var origin = Point()
var size = Size()
var center: Point {
get {
let centerX = origin.x + (size.width / 2)
let centerY = origin.y + (size.height / 2)
return Point(x: centerX, y: centerY)
}
set(newCenter) {
origin.x = newCenter.x - (size.width / 2)
origin.y = newCenter.y - (size.height / 2)
}
}
}
var square = Rect(origin: Point(x: 0.0, y: 0.0),
size: Size(width: 10.0, height: 10.0))
let initialSquareCenter = square.center
square.center = Point(x: 15.0, y: 15.0)
print("square.origin is now at (\(square.origin.x), \(square.origin.y))")
// prints "square.origin is now at (10.0, 10.0)"

这个例子定义了三个结构体来处理几何图形:

  • Point 封装了一个 (x,y) 坐标;
  • Size 封装了一个 width 和 height ;
  • Rect 封装了一个长方形包括原点和大小。

Rect 结构体还提供了一个名为 center 的计算属性。 Rect 的当前中心位置由它的 origin 和 size 决定,所以你不需要把中心点作为一个明确的 Point 值来存储。相反, Rect 为名为 center 的计算变量定义了一个定制的读取器( getter )和设置器( setter ),来允许你使用该长方形的 center ,就好像它是一个真正的存储属性一样。

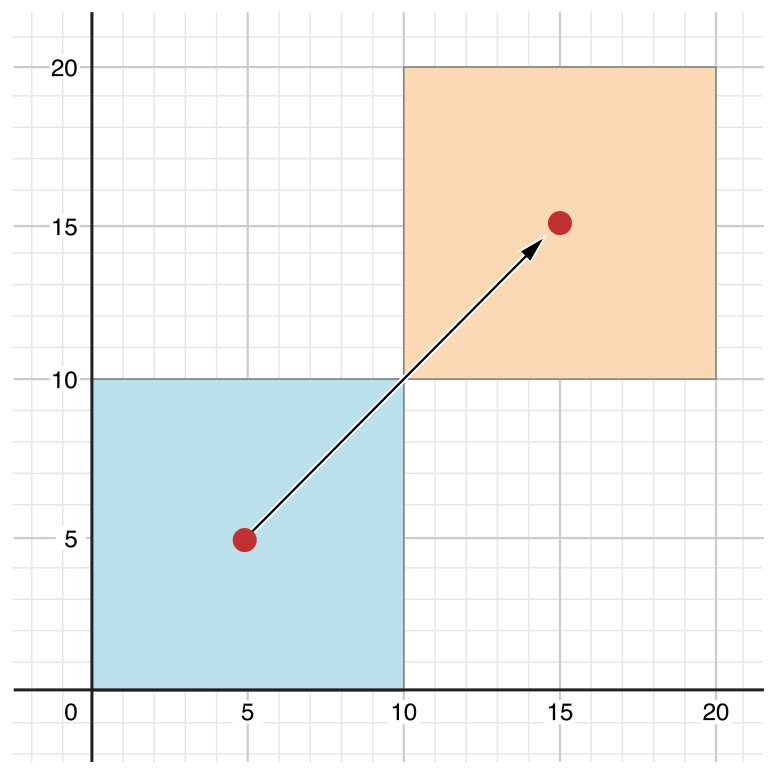
前面的例子创建了一个名为 square 的新 Rect 变量。 square 变量以 (0,0) 为中心点,宽和高为 10 初始化。这个方形在下面的图像中以蓝色方形区域表示。

一堆啰嗦的业务blabla:

1
2
3
4
5
6
7
8
9
10
11
前面的例子创建了一个名为 square 的新 Rect 变量。 square 变量以 (0,0) 为中心点,
宽和高为 10 初始化。这个方形在下面的图像中以蓝色方形区域表示。
square 变量的 center 属性通过点操作符( square. center )来访问,
通过调用 center 的读取器,来得到当前的属性值。而读取器实际上是计算并返回一个新的 Point
来表示这个方形区域的中心,而不是返回一个已存在的值。如上边你看到的,
getter正确返回了一个值为( 5,5 )的中心点。
然后 center 属性被赋予新值( 15,15 ),使得该方形区域被移动到了右上方,
到达下图中如黄色区域所在的新位置。设置 center 属性调用 center 的设置器方法,
通过修改 origin 存储属性中 x 和 y 的值,将该正方形移动到新位置。

computedProperties_2x-1

简写设置器(setter)声明

如果一个计算属性的设置器没有为将要被设置的值定义一个指定名字,那么他将被默认命名为 newValue 。下面是结构体 Rect 的另一种写法,其中利用了简写设置器声明的特性。

1
2
3
4
5
6
7
8
9
10
11
12
13
14
15
struct AlternativeRect {
var origin = Point()
var size = size()
var center: Point {
get {
let centerX = origin.x + (size.width / 2)
let centerY = origin.y + (size.height / 2)
return Point(x: centerX, y: centerY)
}
set {
origin.x = newValue.x - (size.width / 2)
origin.y = newValue.y - (size.height / 2)
}
}
}

只读计算属性

一个有读取器但是没有设置器的计算属性就是所谓的只读计算属性。只读计算属性返回一个值,也可以通过点语法访问,但是不能被修改为另一个值。

注意:
你必须用 var 关键字定义计算属性——包括只读计算属性——为变量属性,因为它们的值不是固定的。 let 关键字只用于常量属性,用于明确那些值一旦作为实例初始化就不能更改。

你可以通过去掉 get 关键字和他的大扩号来简化只读计算属性的声明:

1
2
3
4
5
6
7
8
9
struct Cuboid {
var width = 0.0, height = 0.0, depth = 0.0
var volume: Double {
return width * height * depth
}
}
let fourByFiveByTwo = Cuboid(width: 4.0, height: 5.0, depth: 2.0)
print("the volume of fourByFiveByTwo is \(fourByFiveByTwo.volume)")
// prints "the volume of fourByFiveByTwo is 40.0"

这个例子定义了一个名为 Cuboid 的新结构体,它代表了一个有 width , height 和 depth 属性的三维长方形结构。这个结构体还有一个名为 volume 的只读计算属性,它计算并返回长方体的当前体积。对于 volume 属性来说可被设置并没有意义,因为它会明确 width , height 和 depth 中哪个值用在特定的 volume 值中,对 Cuboid 来说提供一个只读计算属性来让外部用户来发现它的当前计算体积就显得很有用了。

属性观察者

属性观察者会观察并对属性值的变化做出回应。每当一个属性的值被设置时,属性观察者都会被调用,即使这个值与该属性当前的值相同。你可以为你定义的任意存储属性添加属性观察者,除了延迟存储属性。

你不需要为非重写的计算属性定义属性观察者,因为你可以在计算属性的设置器里直接观察和相应它们值的改变。

你可以选择将这些观察者或其中之一定义在属性上:

  • willSet 会在该值被存储之前被调用。
  • didSet 会在一个新值被存储后被调用。

如果你实现了一个 willSet 观察者,新的属性值会以常量形式参数传递。你可以在你的 willSet 实现中为这个参数定义名字。如果你没有为它命名,那么它会使用默认的名字 newValue 。

同样,如果你实现了一个 didSet观察者,一个包含旧属性值的常量形式参数将会被传递。你可以为它命名,也可以使用默认的形式参数名 oldValue 。如果你在属性自己的 didSet 观察者里给自己赋值,你赋值的新值就会取代刚刚设置的值。

注意:
父类属性的 willSet 和 didSet 观察者会在子类初始化器中设置时被调用。它们不会在类的父类初始化器调用中设置其自身属性时被调用。

这里有一个关于 willSet 和 didSet 的使用栗子。下面的栗子定义了一个名为 StepCounter 的新类,它追踪人散步的总数量。这个类可能会用于从计步器或者其他计步工具导入数据来追踪人日常的锻炼情况。

1
2
3
4
5
6
7
8
9
10
11
12
13
14
15
16
17
18
19
20
21
22
class StepCounter {
var totalSteps: Int = 0 {
willSet(newTotalSteps) {
print("About to set totalSteps to \(newTotalSteps)")
}
didSet {
if totalSteps > oldValue {
print("Added \(totalSteps - oldValue) steps")
}
}
}
}
let stepCounter = StepCounter()
stepCounter.totalSteps = 200
// About to set totalSteps to 200
// Added 200 steps
stepCounter.totalSteps = 360
// About to set totalSteps to 360
// Added 160 steps
stepCounter.totalSteps = 896
// About to set totalSteps to 896
// Added 536 steps

StepCounter 类声明了一个 Int 类型的 totalSteps 属性。这是一个包含了 willSet 和 didSet 观察者的储存属性。totalSteps 的 willSet 和 didSet 观察者会在每次属性被赋新值的时候调用。就算新值与当前值完全相同也会如此。

栗子中的 willSet 观察者为增量的新值使用自定义的形式参数名 newTotalSteps ,它只是简单的打印出将要设置的值。

didSet 观察者在 totalSteps 的值更新后调用。它用旧值对比 totalSteps 的新值。如果总步数增加了,就打印一条信息来表示接收了多少新的步数。 didSet 观察者不会提供自定义的形式参数名给旧值,而是使用 oldValue 这个默认的名字。

全局和局部变量

上边描述的计算属性和观察属性的能力同样对全局变量和局部变量有效。全局变量是定义在任何函数、方法、闭包或者类型环境之外的变量。局部变量是定义在函数、方法或者闭包环境之中的变量。

你在之前章节中所遇到的全局和局部变量都是存储变量。存储变量,类似于存储属性,为特定类型的值提供存储并且允许这个值被设置和取回。

总之,你同样可以定义计算属性以及给存储变量定义观察者,无论是全局还是局部环境。计算变量计算而不是存储值,并且与计算属性的写法一致。

注意:
全局常量和变量永远是延迟计算的,与延迟存储属性有着相同的行为。不同于延迟存储属性,全局常量和变量不需要标记 lazy 修饰符。

类型属性

你同样可以定义属于类型本身的属性,不是这个类型的某一个实例的属性。这个属性只有一个拷贝,无论你创建了多少个类对应的实例。这样的属性叫做类型属性。

类型属性在定义那些对特定类型的所有实例都通用的值的时候很有用,比如实例要使用的常量属性(类似 C 里的静态常量),或者储存对这个类型的所有实例全局可见的值的存储属性(类似 C 里的静态变量)。

存储类型属性可以是变量或者常量。计算类型属性总要被声明为变量属性,与计算实例属性一致。

不同于存储实例属性,你必须总是给存储类型属性一个默认值。这是因为类型本身不能拥有能够在初始化时给存储类型属性赋值的初始化器。

存储类型属性是在它们第一次访问时延迟初始化的。它们保证只会初始化一次,就算被多个线程同时访问,他们也不需要使用 lazy 修饰符标记。

类型属性语法

在 C 和 Objective-C 中,你使用全局静态变量来定义一个与类型关联的静态常量和变量。在 Swift 中,总之,类型属性是写在类型的定义之中的,在类型的花括号里,并且每一个类型属性都显式地放在它支持的类型范围内。

使用 static 关键字来开一类型属性。 对于类类型的计算类型属性, 你可以使用 class 关键字来允许子类重写父类的实现。下面的栗子展示了存储和计算类型属性的语法:

1
2
3
4
5
6
7
8
9
10
11
12
13
14
15
16
17
18
19
20
21
struct SomeStructure {
static var storedTypeProperty = "Some value."
static var computedTypeProperty: Int {
return 1
}
}
enum SomeEnumeration {
static var storedTypeProperty = "Some value."
static var computedTypeProperty: Int {
return 6
}
}
class SomeClass {
static var storedTypeProperty = "Some value."
static var computedTypeProperty: Int {
return 27
}
class var overrideableComputedTypeProperty: Int {
return 107
}
}

查询和设置类型属性

类型属性使用点语法来查询和设置。总之,类型属性在类里查询和设置,而不是这个类型的实例。举例来说:

1
2
3
4
5
6
7
8
9
print(SomeStructure.storedTypeProperty)
// prints "Some value."
SomeStructure.storedTypeProperty = "Another value."
print(SomeStructure.storedTypeProperty)
// prints "Another value."
print(SomeEnumeration.computedTypeProperty)
// prints "6"
print(SomeClass.computedTypeProperty)
// prints "27"

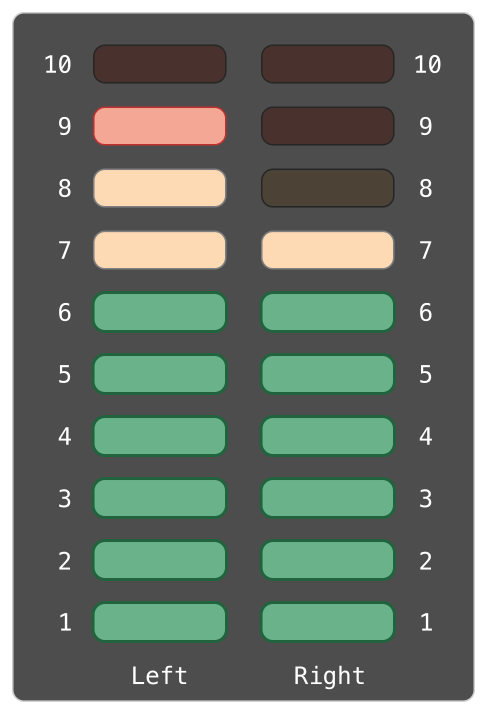
接下来的栗子使用了两个存储类型属性作为建模一个为数字音频信道音频测量表的结构体的一部分。每一个频道都有一个介于 0 到 10 之间的数字音频等级。

下边的图例展示了这个音频频道如何组合建模一个立体声音频测量表。当频道的音频电平为 0,那个对应频道的灯就不会亮。当电平是 10 ,所有这个频道的灯都会亮。在这个图例里,左声道当前电平是 9 ,右声道的当前电平是 7 :
staticPropertiesVUMeter_2x
上边描述的音频声道使用 AudioChannel 结构体来表示:

1
2
3
4
5
6
7
8
9
10
11
12
13
14
15
16
struct AudioChannel {
static let thresholdLevel = 10
static var maxInputLevelForAllChannels = 0
var currentLevel: Int = 0 {
didSet {
if currentLevel > AudioChannel.thresholdLevel {
// cap the new audio level to the threshold level
currentLevel = AudioChannel.thresholdLevel
}
if currentLevel > AudioChannel.maxInputLevelForAllChannels {
// store this as the new overall maximum input level
AudioChannel.maxInputLevelForAllChannels = currentLevel
}
}
}
}

AudioChannel 结构体定义了两个存储类型属性来支持它的功能。第一个, thresholdLevel ,定义了最大限度电平。它是对所有 AudioChannel 实例来说是一个常量值 10 。(如下方描述的那样)如果传入音频信号值大于 10 ,则只会被限定在这个限定值上。

第二个类型属性是一个变量存储属性叫做 maxInputLevelForAllChannels 。它保持追踪任意 AudioChannel 实例接收到的最大输入值。它以 0 初始值开始。

AudioChannel 结构体同样定义了存储实力属性叫做 currentLevel ,它表示声道的当前音频电平标量从 0 到 10 。

currentLevel 属性有一个 didSet 属性观察者来检查每次 currentLevel 设定的值,这个观察者执行两个检查:

  • 如果 currentLevel 的新值比允许的限定值要大,属性观察者就限定 currentLevel 为 thresholdLevel ;
  • 如果 currentLevel 的新值(任何限定之后)比之前任何 AudioChannel 实例接收的都高,属性观察者就在 maxInputLevelForAllChannels 类型属性里储存 currentLevel 的新值。

注意
在这两个检查的第一个中, didSet 观察者设置 currentLevel 为不同的值。总之,它不会导致观察者的再次调用。

你可以使用 AudioChannel 结构体来创建两个新的音频声道 leftChannel 和 rightChannel ,来表示双声道系统的音频等级:

1
2
var leftChannel = AudioChannel()
var rightChannel = AudioChannel()

1.如果你设置左声道的 currentLevel 为 7 ,你就会看到 maxInputLevelForAllChannels 类型属性被更新到了 7 :

1
2
3
4
5
6
7
8
9
10
leftChannel.currentLevel = 7
print(leftChannel.currentLevel)
// prints "7"
print(AudioChannel.maxInputLevelForAllChannels)
// prints "7"
leftChannel.currentLevel = 7
print(leftChannel.currentLevel)
// prints "7"
print(AudioChannel.maxInputLevelForAllChannels)
// prints "7"

2.如果你尝试去设置右声道的 currentLevel 到 11 ,你就会看到右声道的 currentLevel 属性被上限限制到了最大值 10 ,并且 maxInputLevelForAllChannels 类型属性被更新到了 10 :

1
2
3
4
5
6
7
8
9
10
rightChannel.currentLevel = 11
print(rightChannel.currentLevel)
// prints "10"
print(AudioChannel.maxInputLevelForAllChannels)
// prints "10"
rightChannel.currentLevel = 11
print(rightChannel.currentLevel)
// prints "10"
print(AudioChannel.maxInputLevelForAllChannels)
// prints "10"

摘自:swift 官网
所有代码在Xcode9 Swift4 环境编译没问题,代码戳这里 https://github.com/keshiim/LearnSwift4
Leetcode-243 Shortest Word Distance

发表于 2017-11-17 | 分类于 LeetCode | | 阅读次数

题目描述

Given a list of words and two words word1 and word2, return the shortest distance between these two words in the list.

Example

1
2
3
Assume that words=["practice", "makes", "perfect", "coding", "makes"]
Given word1 = “coding”, word2 = “practice”, return 3.
Given word1 = "makes", word2 = "coding", return 1.

Note

You may assume that word1 does not equal to word2, and word1 and word2 are both in the list.


分析

这道题,首先是遍历一遍数组,我们把出现word1和word2的给定单词所有出现的位置分别存入两个数组里,然后我们对这两个数组进行两两比较更新结果,代码如下:

解法1

C++

1
2
3
4
5
6
7
8
9
10
11
12
13
14
15
16
class Solution {
int shortestDistance(vector<string>& words, string word1, string word2) {
vector<int> idx1, idx2;
int res = INT_MAX;
for (int i = 0; i < words.size(); i++) {
if (words[i] == word1) idx1.push_back(i);
else if (words[i] == word2) idx2.push_back(i);
}
for (int i = 0; i < idx1.size(); ++i) {
for (int j = 0; j < idx2.size(); ++j) {
res = min(res, abs(idx1[i] - idx2[j]));
}
}
return res;
}
}

Swift

1
2
3
4
5
6
7
8
9
10
11
12
13
14
15
func shortestDistance(_ words: [String], word1: String, word2: String) -> Int {
var idx1: [Int] = [Int](), idx2 = [Int]()
var res = Int.max
for i in 0..<words.count {
if words[i] == word1 { idx1.append(i) }
else if words[i] == word2 { idx2.append(i) }
}
for i in 0..<idx1.count {
for j in 0..<idx2.count {
res = min(res, abs(idx1[i] - idx2[j]))
}
}
return res
}
print(shortestDistance(["practice", "makes", "perfect", "coding", "makes"], word1: "makes", word2: "coding"))

解法2

上面的那种方法并不高效,我们其实需要遍历一次数组就可以了,我们用两个变量p1, p2初始化为-1,然后我们遍历数组,遇到单词1,就将其位置存在p1里,若遇到单词2,就将其位置存在p2里,如果此时p1, p2都不为-1了,那么我们更新结果,参见代码如下:

C++

1
2
3
4
5
6
7
8
9
10
11
12
class Solution {
public:
int shortestDistance(vector<string>& words, string word1, string word2) {
int p1 = -1, p2 = -1, res = INT_MAX;
for (int i = 0; i < words.size(); ++i) {
if (words[i] == word1) p1 = i;
else if (words[i] == word2) p2 = i;
if (p1 != -1 && p2 != -1) res = min(res, abs(p1 - p2));
}
return res;
}
};

Swift

1
2
3
4
5
6
7
8
9
10
11
12
13
14
func shortestDistance1(_ words: [String], word1: String, word2: String) -> Int {
var idx1: Int = -1, idx2 = -1
var res = Int.max
for i in 0..<words.count {
if words[i] == word1 { idx1 = i}
else if words[i] == word2 { idx2 = i}
if idx1 != -1 && idx2 != -1 {
res = min(res, abs(idx1 - idx2))
}
}
return res
}
print(shortestDistance1(["practice", "makes", "perfect", "coding", "makes"], word1: "coding", word2: "practice"))
// Print "3"

解法3

下面这种方法只用一个辅助变量idx,初始化为-1,然后遍历数组,如果遇到等于两个单词中的任意一个的单词,我们在看idx是否为-1,若不为-1,且指向的单词和当前遍历到的单词不同,我们更新结果,参见代码如下:

C++

1
2
3
4
5
6
7
8
9
10
11
12
13
14
15
class Solution {
public:
int shortestDistance(vector<string>& words, string word1, string word2) {
int idx = -1, res = INT_MAX;
for (int i = 0; i < words.size(); ++i) {
if (words[i] == word1 || words[i] == word2) {
if (idx != -1 && words[idx] != words[i]) {
res = min(res, i - idx);
}
idx = i;
}
}
return res;
}
};

Swift

1
2
3
4
5
6
7
8
9
10
11
12
13
14
15
func shortestDistance2(_ words: [String], word1: String, word2: String) -> Int {
var idx = -1
var res = Int.max
for i in 0..<words.count {
if words[i] == word1 || words[i] == word2 {
if idx != -1 && words[i] != words[idx] {
res = min(res, abs(i - idx))
}
idx = i
}
}
return res
}
print(shortestDistance2(["practice", "makes", "perfect", "coding", "makes"], word1: "coding", word2: "practice"))
// Prints "3"

参考资料:

https://leetcode.com/discuss/50234/ac-java-clean-solution
https://leetcode.com/discuss/61820/java-only-need-to-keep-one-index

Leetcode-1 Two Sum

发表于 2017-11-16 | 分类于 LeetCode | | 阅读次数

题目描述

Two Sum(两数之和)

Given an array of integers, return indices of the two numbers such that they add up to a specific target.
You may assume that each input would have exactly one solution, and you may not use the same element twice.

Example

1
2
3
4
Given nums = [2, 7, 11, 15], target = 9,
Because nums[0] + nums[1] = 2 + 7 = 9,
return [0, 1].

分析

咋一看这道题就知道用暴力迭代肯定能解决问题,但是LeetCode肯定不会接受这种暴力搜索这么简单的方法(其时间复杂度$O(n^2)$)。

解法1

先遍历一遍数组,建立map<key=(数组值), vale=(索引)>数据。然后再遍历一遍,开始超找,找到则记录index。代码如下:

C++

1
2
3
4
5
6
7
8
9
10
11
12
13
14
15
16
17
18
19
class Solution {
public:
vector<int> twoSum(vector<int>& nums, int target) {
unordered_map<int, int>m;
vector<int> res;
for(int i = 0; i < nums.size(); i++) {
m[nums[i]] = i;
}
for(int i = 0; i < nums.size(); i++) {
int t = target - nums[i];
if (m.count(t) && m[t] != i) {
res.push_back(i);
res.push_back(m[t]);
break;
}
}
return res;
}
};

Swift

1
2
3
4
5
6
7
8
9
10
11
12
13
14
15
16
17
18
class Solution {
func twoSum(_ nums: [Int], _ target: Int) -> [Int] {
var map: [Int: Int] = [:]
for i in 0..<nums.count {
map[nums[i]] = i
}
var res = [Int]()
for i in 0..<nums.count {
let t = target - nums[i]
if let index = map[t], map[t] != i {
res.append(i)
res.append(index)
break;
}
}
return res
}
}

解法2

或者我们可以写的更加简洁一些,把两个for循环合并成一个:

C++

1
2
3
4
5
6
7
8
9
10
11
12
13
class Solution {
public:
vector<int> twoSum(vector<int>& nums, int target) {
unordered_map<int, int> m;
for (int i = 0; i < nums.size(); ++i) {
if (m.count(target - nums[i])) {
return {i, m[target - nums[i]]};
}
m[nums[i]] = i;
}
return {};
}
};

Swift

1
2
3
4
5
6
7
8
9
10
11
12
class Solution {
func twoSum(_ nums: [Int], _ target: Int) -> [Int] {
var map: [Int: Int] = [:]
for i in 0..<nums.count {
if let index = map[target - nums[i]] {
return [index, i]
}
map[nums[i]] = i
}
return []
}
}

Leetcode-566 Reshape the Matrix

发表于 2017-11-16 | 分类于 LeetCode | | 阅读次数

题目描述

Reshape the Matrix(重组矩阵)

In MATLAB, there is a very useful function called ‘reshape’, which can reshape a matrix into a new one with different size but keep its original data.

You’re given a matrix represented by a two-dimensional array, and two positive integers r and c representing the row number and column number of the wanted reshaped matrix, respectively.

The reshaped matrix need to be filled with all the elements of the original matrix in the same row-traversing order as they were.

If the ‘reshape’ operation with given parameters is possible and legal, output the new reshaped matrix; Otherwise, output the original matrix.

Example1

1
2
3
4
5
6
7
8
9
10
11
Input:
nums =
[[1,2],
[3,4]]
r = 1, c = 4
Output:
[[1,2,3,4]]
Explanation:
The row-traversing of nums is [1,2,3,4]. The new reshaped matrix is a 1 * 4 matrix, fill it row by row by using the previous list.

Example2

1
2
3
4
5
6
7
8
9
10
11
12
Input:
nums =
[[1,2],
[3,4]]
r = 2, c = 4
Output:
[[1,2],
[3,4]]
Explanation:
There is no way to reshape a 2 * 2 matrix to a 2 * 4 matrix. So output the original matrix.

Note

  1. The height and width of the given matrix is in range [1, 100].
  2. The given r and c are all positive.

分析

这道题让我们实现矩阵大小的重塑。
答题思路: 对于这种二维数组大小重新分配的问题的关键就是对应位置的坐标转换,最直接的办法就是把原数组拉直,变成一条直线,然后再组成新数组。

解法1

这道题我们先判断给定数组是否能重塑成给定的大小,就是看两者的元素个数是否相同,直接行数乘以列数即可,然后我们重建一个目标大小的数组,并开始遍历,对于每个位置,我们先转为拉之后的一维坐标,然后在算出在原数组中的对应位置复制过来即可,代码如下:

C++

1
2
3
4
5
6
7
8
9
10
11
12
13
14
15
class Solution {
public:
vector<vector<int>> matrixReshape(vector<vector<int>>& nums, int r, int c) {
int m = nums.size(), n = nums[0].size();
if (m * n != r * c) return nums;
vector<vector<int>> res(r, vector<int>(c));
for (int i = 0; i < r; i++) {
for (int j = 0; j < c; j++) {
int k = i * c + j;
res[i][j] = nums[k / n][k % n];
}
}
return res;
}
};

Swift

1
2
3
4
5
6
7
8
9
10
11
12
13
func matrixReshape(_ nums: [[Int]], _ r: Int, _ c: Int) -> [[Int]] {
let m = nums.count, n = nums[0].count
if (m * n != r * c) { return nums }
var res = [[Int]](repeating: [Int](repeating: 0, count: c), count: r)
for i in 0..<r {
for j in 0..<c {
let k = i * c + j
res[i][j] = nums[k / n][k % n]
}
}
return res
}
print(matrixReshape([[1, 2], [3, 4]], 1, 4))

解法2

下面这种方法整体思路和上面没啥区别,但是只使用了一个循环,直接就是遍历拉直后的一维数组的坐标,然后分别转换为两个二维数组的坐标进行赋值,参见代码如下:

C++

1
2
3
4
5
6
7
8
9
10
11
12
class Solution {
public:
vector<vector<int>> matrixReshape(vector<vector<int>>& nums, int r, int c) {
int m = nums.size(), n = nums[0].size();
if (m * n != r * c) return nums;
vector<vector<int>> res(r, vector<int>(c));
for (int i = 0; i < r * c; i++) {
res[i / c][i % c] = nums[i / n][i % n];
}
return res;
}
};

Swift

1
2
3
4
5
6
7
8
9
10
func matrixReshape(_ nums: [[Int]], _ r: Int, _ c: Int) -> [[Int]] {
let m = nums.count, n = nums[0].count
if (m * n != r * c) { return nums }
var res = [[Int]](repeating: [Int](repeating: 0, count: c), count: r)
for i in 0..<r*c {
res[i / c][i % c] = nums[i / n][i % n]
}
return res
}
print(matrixReshape([[1, 2], [3, 4]], 1, 4))

Swift:类和结构体

发表于 2017-11-15 | 分类于 学习 , Swift | | 阅读次数

作为你程序代码的构建基础,类和结构体是一种多功能且灵活的构造体。通过使用与现存常量、变量、函数完全相同的语法来在类和结构体当中定义属性和方法以添加功能。

值得一提的是Swift不像其他的程序语言,不需要你为自定义类和结构体创建独立的*接口和实现文件。在 Swift 中,你在一个文件中定义一个类或者结构体*, 则系统将会自动生成面向其他代码的外部接口。

一个类的实例通常被称为对象。总之,Swift 的类和结构体在功能上要比其他语言中的更加相近,并且本章节所讨论的大部分功能都可以同时用在类和结构体的实例上。因此,我们使用更加通用的术语实例。

类与结构体的对比

在 Swift 中类和结构体有很多共同之处,它们都能:

  • 定义属性用来存储值;
  • 定义方法用于提供功能;
  • 定义下标脚本用来允许使用下标语法访问值;
  • 定义初始化器用于初始化状态;
  • 可以被扩展来默认所没有的功能;
  • 遵循协议来针对特定类型提供标准功能。

然后是,类有而结构体没有的额外功能:

  • 继承允许一个类继承另一个类的特征;
  • 类型转换允许你在运行检查和解释一个类实例的类型;
  • 反初始化器允许一个类实例释放任何其所被分配的资源;
  • 引用计数允许不止一个对类实例的引用。

定义语法

类与结构体有着相似的定义语法,你可以通过使用关键词 class来定义类使用 struct来定义结构体。并在一对大括号内定义它们的具体内容。

1
2
3
4
5
6
class SomeClass {
//class definition goes here
}
struct SomeStruct {
//Structure definition goes here
}

无论你在何时定义了一个新的类或者结构体,实际上你定义了一个全新的 Swift 类型。请用 UpperCamelCase 驼峰命名法命名 (比如这里我们说到的 SomeClass和 SomeStructure)以符合 Swift 的字母大写风格(比如说 String , Int 以及 Bool)。相反,对于属性和方法使用 lowerCamelCase命名法 (比如 frameRate 和 incrementCount),以此来区别于类型名称。

下面是类定义和结构体定义的栗子🌰:

1
2
3
4
5
6
7
8
9
10
struct Resolution {
var width = 0
var height = 0
}
class VideoMode {
var resolution = Resolution()
var interlaced = false
var frameRate = 0.0
var name: String?
}

上面这个这个例子定义了一个名叫 Resolution的新结构体,用来描述一个基于像素的显示器分辨率。这个结构体拥有两个存储属性名叫 width和 height,存储属性是绑定并储存在类或者结构体中的常量或者变量。这两个属性因以值 0 来初始化,所以它们的类型被推断为 Int 。

例子也定义了一个名叫 VideoMode的新类,用来描述一个视频显示的特定视频模式。这个类有四个变量存储属性。第一个, resolution,用 Resolution结构体实例来初始化,它使属性的类型被推断为 Resolution。对于其他三个属性来说,新的 VideoMode实例将会以 interlaced为 false (意思是“非隔行扫描视频”),回放帧率为 0.0,和一个名叫 name的可选项 String值来初始化 。 name属性会自动被赋予一个空值 nil ,或“无 name值”,因为它是一个可选项。

类与结构体实例

Resolution结构体的定义和 VideoMode类的定义仅仅描述了什么是 Resolution或 VideoMode。它们自己并没有描述一个特定的分辨率或视频 模式。对此,你需要创建一个结构体或类的实例。
创建结构体和类的实例的语法是非常相似的:

1
2
let someResolution = Resolution()
let somVideoMode = VideoMode()

结构体和类两者都能使用初始化器语法来生成新的实例。初始化器语法最简单的是在类或结构体名字后面接一个空的圆括号,例如 Resolution()或者 VideoMode()。这样就创建了一个新的类或者结构体的实例,任何属性都被初始化为它们的默认值。在初始化一章有对类和结构体的初始化更详尽的描述。

此时,结构体Resolution已存在一个隐式的初始化方法,let someResolution = Resolution(width: Int, height: Int)方式调用

访问属性

你可以用点语法来访问一个实例的属性。在点语法中,你只需在实例名后面书写属性名,用(.)来分开,无需空格:

1
2
print("The width of someResolution is \(someResolution.width)")
// prints "The width of someResolution is 0"

你可以继续下去来访问子属性,如 VideoMode中 resolution属性中的 width属性:

1
2
print("The width of someVideoMode is \(someVideoMode.resolution.width)")
// prints "The width of someVideoMode is 0"

你亦可以用点语法来指定一个新值到一个变量属性中:

1
2
3
someVideoMode.resolution.width = 1280
print("The width of someVideoMode is now \(someVideoMode.resolution.width)")
// prints "The width of someVideoMode is now 1280"

不同于 Objective-C,Swift 允许你直接设置一个结构体属性中的子属性。在上述最后一个栗子中, someVideoMode的 resolution属性中的 width这个属性可以直接设置,不用你重新设置整个 resolution 属性到一个新值。

结构体类型的成员初始化器

所有的结构体都有一个自动生成的成员初始化器,你可以使用它来初始化新结构体实例的成员属性。新实例属性的初始化值可以通过属性名称传递到成员初始化器中:

1
let vga = Resolution(width: 640, height: 480)
1
"与结构体不同,类实例不会接收默认的成员初始化器."

结构体和枚举是值类型

值类型是一种当它被指定到常量或者变量,或者被传递给函数时会被拷贝的类型

其实,在之前的章节中我们已经大量使用了值类型。实际上,Swift 中所有的基本类型——整数,浮点数,布尔量,字符串,数组和字典——都是值类型,并且都以结构体的形式在后台实现。

Swift 中所有的结构体和枚举都是值类型,这意味着你所创建的任何结构体和枚举实例——和实例作为属性所包含的任意值类型——在代码传递中总是被拷贝的。

举个栗子,其使用了前面例子中的 Resolution结构体:

1
2
let hd = Resolution(width: 1920, height: 1080)
let cinema = hd

这个栗子声明了一个叫 hd 的常量,并且赋予它一个以全高清视频( 1920像素宽乘以 1080像素高)宽和高初始化的 Resolution实例。

之后声明了一个叫 cinema的变量并且以当前 hd 的值进行初始化。因为 Resolution是一个结构体,现有实例的拷贝会被制作出来,然后这份新的拷贝就赋值给了 cinema。尽管 hd和 cinema有相同的像素宽和像素高,但是在后台中他们是两个完全不同的实例。

接下来,为了适应数字影院的放映需求 ( 2048像素宽和 1080像素高),我们把 cinema的属性 width修改为稍宽一点的 2K 标准:

1
2
3
4
5
cinema.width = 2048
print("cinema is now \(cinema.width) pixels wide") //检查 cinema的 width属性发现已被改成 2048
//println "cinema is now 2048 pixels wide"
print("hd is still \(hd.width) pixels wide") //原始 hd实例中的 width属性依旧是 1920:
// prints "hd is still 1920 pixels wide"

这种行为规则同样适用于枚举。

类是引用类型

不同于值类型,在引用类型被赋值到一个常量,变量或者本身被传递到一个函数的时候它是不会被拷贝的。相对于拷贝,这里使用的是同一个对现存实例的引用。

这里有个栗子,使用上面定义的 VideoMode类:

1
2
3
4
5
let tenEighty = VideoMode()
tenEighty.resolution = hd
tenEighty.interlaced = true
tenEighty.name = "1080i"
tenEighty.frameRate = 25.0

这个栗子声明了一个新的名叫 tenEighty的常量并且设置它引用一个 VideoMode类的新实例,这个视频模式复制了之前的 1920 乘 1080的HD分辨率。同时设置为隔行扫描,并且给予了一个名字“ 1080i”。最后,设置了 25.0帧每秒的帧率。

然后, tenEighty是赋给了一个名叫 alsoEighty的新常量,并且将其帧率修改:

1
2
let alsoTenEighty = tenEighty
alsoTenEighty.frameRate = 30.0

因为类是引用类型, tenEighty 和 alsoTenEighty其实都是引用了相同的 VideoMode实例。实际上,它们只是相同实例的两个不同命名罢了。

下面, tenEighty的 frameRate属性展示了它正确地显示了来自于 VideoMode实例的新帧率:

1
2
print("The frameRate property of tenEighty is now \(tenEighty.frameRate)")
// prints "The frameRate property of tenEighty is now 30.0"

注意 tenEighty和 alsoTenEighty都被声明为常量。然而,你仍然能改变 tenEighty.frameRate和 alsoTenEighty.frameRate因为 tenEighty和 alsoTenEighty常量本身的值不会改变。 tenEighty和 alsoTenEighty本身是并没有存储 VideoMode实例 — 相反,它们两者都在后台指向了 VideoMode实例。这是 VideoMode的 frameRate属性在改变而不是引用 VideoMode的常量的值在改变。

特征运算符

因为类是引用类型,在后台有可能有很多常量和变量都是引用到了同一个类的实例。但相对于结构体和枚举来说并不是真的相同,因为它们在赋予给常量,变量或者被传递给一个函数时总是被拷贝过去的。

有时候找出两个常量或者变量是否引用自同一个类实例非常有用,为了允许这样,Swift提供了两个特点运算符:

  • 相同于 (===)
  • 不相同于 (!==)

利用这两个恒等运算符来检查两个常量或者变量是否引用相同的实例:

1
2
3
4
if tenEighty === alsoTenEighty {
print("tenEighty and alsoTenEighty refer to the same VideoMode instance.")
}
// prints "tenEighty and alsoTenEighty refer to the same VideoMode instance."

注意”相同于”(用三个等于号表示,或者说 ===)这与”等于”的意义不同(用两个等于号表示,或者说 ==)。

  • “相同于”意味着两个类类型常量或者变量引用自相同的实例;
  • “等于”意味着两个实例的在值上被视作“相等”或者“等价”,某种意义上的“相等”,就如同类设计者定义的那样。

指针

如果你有过 C,C++ 或者 Objective-C 的经验,你可能知道这些语言使用可指针来引用内存中的地址。一个 Swift 的常量或者变量指向某个实例的引用类型和 C 中的指针类似,但是这并不是直接指向内存地址的指针,也不需要你书写星号(*)来明确你建立了一个引用。相反,这些引用被定义得就像 Swift 中其他常量或者变量一样。

类和结构体之间的选择

类和结构体都可以用来定义自定义的数据类型,作为你的程序代码构建块。

总之,结构体实例总是通过值来传递,而类实例总是通过引用来传递。这意味着他们分别适用于不同类型的任务。当你考虑你的工程项目中数据结构和功能的时候,你需要决定把每个数据结构定义成类还是结构体。

按照通用准则,当符合以下一条或多条情形时应考虑创建一个结构体:

  • 结构体的主要目的是为了封装一些相关的简单数据值;
  • 当你在赋予或者传递结构实例时,有理由需要封装的数据值被拷贝而不是引用;
  • 任何存储在结构体中的属性是值类型,也将被拷贝而不是被引用;
  • 结构体不需要从一个已存在类型继承属性或者行为。

合适的结构体候选者包括:

  • 几何形状的大小,可能封装了一个 width属性和 height属性,两者都为 double类型;
  • 一定范围的路径,可能封装了一个 start属性和 length属性,两者为 Int类型;
  • 三维坐标系的一个点,可能封装了 x , y 和 z属性,他们都是 double类型。

在其他的情况下,定义一个类,并创建这个类的实例通过引用来管理和传递。事实上,大部分的自定义的数据结构应该是类,而不是结构体。

字符串,数组和字典的赋值与拷贝行为

Swift 的 String , Array 和 Dictionary类型是作为结构体来实现的,这意味着字符串,数组和字典在它们被赋值到一个新的常量或者变量,亦或者它们本身被传递到一个函数或方法中的时候,其实是传递了拷贝。

这种行为不同于基础库中的 NSString, NSArray和 NSDictionary,它们是作为类来实现的,而不是结构体。 NSString , NSArray 和 NSDictionary实例总是作为一个已存在实例的引用而不是拷贝来赋值和传递。

注意:在上述有关字符串,数组和字典“拷贝”的描述中。你在代码中所见到的行为好像总是拷贝。然而在后台 Swift 只有在需要这么做时才会实际去拷贝。Swift 能够管理所有的值的拷贝来确保最佳的性能,所有你也没必要为了保证最佳性能来避免赋值。

摘自:swift 官网
所有代码在Xcode9 Swift4 环境编译没问题,代码戳这里 https://github.com/keshiim/LearnSwift4

Leetcode-561 Array Partition I

发表于 2017-11-14 | 分类于 LeetCode | | 阅读次数

题目描述

Array Partintion I (数组分割I)

Given an array of 2n integers, your task is to group these integers into n pairs of integer, say (a1, b1), (a2, b2), …, (an, bn) which makes sum of min(ai, bi) for all i from 1 to n as large as possible.

Example

1
2
3
4
Input: [1,4,3,2]
Output: 4
Explanation: n is 2, and the maximum sum of pairs is 4 = min(1, 2) + min(3, 4).

Note

  1. n is a positive integer, which is in the range of [1, 10000].
  2. All the integers in the array will be in the range of [-10000, 10000].

分析

这道题,让我们分隔数组形成两两一对,让每对中较小数的和最大。

若要最大化每对中的较小数之和,那么肯定是没对中两个数字大小越相近也好。因为如果差距过大,而我们只取每对中最小数字,那么较大的那个数就被浪费掉了。因此,我们只需要给数组排序,然后按照顺序的每两个就是一对。取出每对中第一个数字(较小值)累加起来即可。

代码

Swift

1
2
3
4
5
6
7
8
9
10
11
12
13
14
15
16
17
func arrayPairSum(_ nums: [Int]) -> Int {
var res = 0
let n = nums.count
let numsSored = nums.sorted{ $0 < $1 } //排序
for i in stride(from: 0, to: n, by: 2) {
res += numsSored[i]
}
return res
}
/*
这里使用到了Swift标准库里 Collection定义的函数做迭代步长
/// Returns the sequence of values (`self`, `self + stride`, `self +
/// 2 * stride`, ... *last*) where *last* is the last value in the
/// progression that is less than `end`.
public func stride<T>(from start: T, to end: T, by stride: T.Stride) -> StrideTo<T> where T : Strideable
*/

C++

1
2
3
4
5
6
7
8
9
10
11
class Solution {
public:
int arrayPairSum(vector<int>& nums) {
int res = 0, n = nums.size();
sort(nums.begin(), nums.end());
for(int i = 0; i < n; i+=2) {
res += nums[i];
}
return res;
}
};

Java

1
2
3
4
5
6
7
8
9
10
class Solution {
public int arrayPairSum(int[] nums) {
int res = 0, n = nums.length;
Arrays.sort(nums);
for(int i = 0; i < n; i+=2) {
res += nums[i];
}
return res;
}
}
12345
Zheng keshiim

Zheng keshiim

一个☝程序猿的播种天地

45 日志
7 分类
16 标签
RSS
GitHub Twitter Weibo 知乎
© 2017 - 2018 Zheng keshiim
由 Hexo 强力驱动
主题 - NexT.Mist